


The hair fashion industry has always been a little bit guilty of forgetting the deep and mysterious potential of brunette hair in favour of the more flashy, bright shades. This is something Wella wanted to change with their Bronde Luxe collection. Brunettes shouldn't feel left out or made to feel that brown hair is in any way less fashionable than blonde, red or fantasy coloured hair. Brunette hair can achieve a kind of multidimensional feel through the use of shadow and light that is subtle and gorgeous all at the same time. We thought we'd take a closer look at two of our favourite shades from this revolutionary Bronde/Brunette collection to help you re-invent what you thought you knew about brown hair.


Current Wella Offers
-
2 x Wella Litre Shampoos for £13.80 Plus a FREE Pump
Mix-n-match
2 x Wella Litre Shampoos for £13.80 Plus a FREE Pump
-
Koleston Perfect 60ml + Koleston Perfect Innosense 60ml
Mix-n-match
Buy any 6 tubes and get a FREE 1L Developer (worth £8.75)
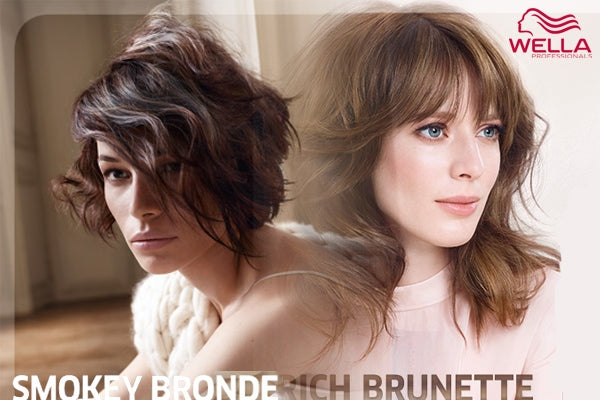
Smokey Bronde
Complexity:Mid Colour Placement: Teardrop sections Colour Formulas:- A Illumina Color 5/35 + 5/7 (2:1) + Welloxon Perfect 6%
- B Illumina Color 10/ + Welloxon Perfect 12%
- C Illumina Color Colouration 6/16 + 2 parts Welloxon Perfect Pastel
COLOR
Step 01: Create a triangle teardrop section at the top of the head and fringe area. The entire section below colour from roots to ends with colour A. Step 02: Work on the teardrop section with back-to-back slicing - alternating colour A, B, A to create an offset, light top colour effect. Once development time is complete, Rinse, shampoo and condition with Wella Brilliance Conditioner. Step 03: On damp hair, apply colour C to the teardrop section. Develop and remove in the normal manner.
Alternative Shades:
COLOR TOUCH
Colour A: 6/35 + 5/75 (2:1) Colour B: Blondor Multi Blonde Powder Colour C: 6/0 + 5/66 (3:1)STYLE
Step 01: Prep the hair with EIMI Root Shoot at the roots and EIMI Perfect Setting all over. Start blow-drying with your fingers at the bottom of the neck and create movement in a wave-like texture by using a round brush. Step 02: Make a wave shape with your straighteners/styler. Spray EIMI Dynamic Fix for more hold but still a workable texture. Work this way all around the head; this will create the editorial shape. Finish off the look with EIMI Dry Me to create a matte and voluminous texture.
Rich Brunette
Natural Colour:5/0 with 30% grey/white hair Colour in mid-length and ends: 7/3 Condition: Untreated Colour Placement: Oval and Triangle Colour Formulas:- A Koleston Perfect 6/7 + Welloxon Perfect 6%
- B Koleston Perfect 8/38 + Welloxon Perfect 9%
- C Koleston Perfect 7/7 + Welloxon Perfect 6%
COLOR
Step 01: Section hair as shown into a large oval section on top of the head and take a triangle section at the font fringe. Step 02: Start at the sides with colour A at the root blending into colour B in the mid-length and then back to colour A in the ends. Step 03: Continue working in the same way through the sides and back, up to the edge of the large oval section. Step 04: Release the large oval section and from a center parting take a 3cm zig-zag section either side of the parting, secure with a clip. Step 05: Continue working through the oval section up to the zig-zag on either side in the same way with colours A and B. Step 06: Release the hair in the zig-zag section and apply colour C at the root, colour B in the mid-length and colour C in the ends. Do the same through the final fringe section to complete.
CUT
Step 01: Starting at the front elevate the hair and slide cut the fringe to fall at the center of the nose. Step 02: Take 3cm sections working from the hat line to the front hair line and over-direct the hair to the center of the nose. Slide cut leaving length towards the ends. Repeat on the other side. Step 03: Continue in this way through all sections to the center back using the side section length as the initial guide. Repeat on the other side. Step 04: Slide cut through the fringe to create soft texture.
STYLE
Step 01: Apply EIMI Sugar Lift to create a grippy and touchable wavy texture with shine. Step 02: Blow-dry the hair using a medium round brush in different directions twisting the hair to create a wave movement. Step 03: Finish off the look by working EIMI Grip Cream into the palm of your hand to create this modern and grippy texture. Step 04: Care at home with Brilliance Shampoo, Brilliance Mask, Color Recharge Warm Brunette Conditioner and Oil Reflection Oil.
Share


